

Bindings are one of the best ways of connecting your view and model on the Mac but due to the layers of abstraction involved — and the fact that they don't exist on other platforms — bindings can seem foreign and confusing. In this post, I'll show a complex view that is traditionally implemented without bindings (the iPhone's UITableView) and show how it might be redesigned for the Mac with bindings.
The aim
I'm going to show the design of ColumnView, a Mac NSView subclass which operates in a similar manner to the iPhone's UITableView.
Specifically, the ColumnView will lay out RowViews (a proper NSView subclass instead of cells like NSTableView arranges). The rows are grouped in sections (sections may have a header and may be independently sorted). The rows can have different heights and be different classes.
I'm not aiming to make this a fully-fledged UITableView recreation — it won't support significant interactivity, animation or editing modes, although all these things could be added to the design (it is designed to be a flexible foundation, even if all features aren't present).
The aim of this design is to show that the entire structure and configuration of the ColumnView can be done with one binding. The UITableViewDataSource/UITableViewDelegate, normally required for a UITableView, can all be replaced by this single binding.
I won't be looking at bindings in Interface Builder in this post. I realize that is how most people configure bindings but to keep the number of topics down, I'm going to limit discussion to bindings configured in code.
Background: controller heavy implementations
Traditionally, Model-View-Controller would work like this:
- Model — sends notifications when it changes but otherwise keeps to itself
- Controller — receives model notifications and actively changes views in response
- View — passive and simply shows information the controller shoves at it
This works well but the controller ends up being huge because it contains all the logic of responding to changes, configuring the view, plus all of the interactivity work that may be required by the views.
A number of larger views, including the iPhone's UITableView and the Mac's NSTableView (without bindings) operate on a delegate model which breaks the controller up slightly:
- Model — (as before) sends notifications when it changes but otherwise keeps to itself
- Controller — pushes new data to the delegate and notifies the view that it needs an update
- View — determines areas needing an update and asks the delegate how to display those areas
- View delegate — tells the view how to update based on data from the controller
A view delegate is really just a controller but since it is invoked by the view, it allows the view to control when data is loaded and changes are made (the view can control lazy load order).
Ultimately though, this second case can still involve a lot of code to configure the view and provide it with data. The potential advantage of breaking the controller into two pieces (the controller and the view delegate) is normally lost since both are frequently implemented in the same class.
Bindings: a reusable controller
The controller heavy nature of the above approaches can be burdensome as you need to rewrite the controller every single time — it is entirely specific to the mode and view that it joins.
Cocoa Bindings are a way of eliminating implementation specific controller code — the entire controller layer can be handled with reusable controllers and observations and configurations specified in data, not code.
Cocoa Bindings purpose in one sentence: If you can simplify your design so that all a controller needs to do is copy data from the model to the view, then the controller's role can be replaced by a simple, reusable "binding" object and all that remains is to configure that binding object with data.
The bindings structure is then:
- Model — (as before) sends notifications when it changes but otherwise keeps to itself
- KVO interface/controller — the interface that the model exposes must be Key Value Observing compliant. This interface may be part of the Model, or it can be a lightweight wrapper around the model, or a generic controller like NSArrayController.
- Key Value Binding — ensures that data from the KVO controller is pushed to an object with exposed bindings. May pass the data through an NSValueTransformer before pushing to the exposed binding. A binding may also contain an options dictionary which tells the view how to handle data it receives.
- View — determines areas needing an update and asks the delegate how to display those areas
- Exposed binding — any Key Value Coding compliant property on the view but may also have options and other metadata to support Interface Builder and configuration.
While I've included more layers in this description, most of the time, you'll only deal with two: the model and the view.
The "Key Value Binding" layer is entirely automatic — in fact, unless you're hacking or looking closely at the stack, you won't actually see the classes that handle this layer. It will "just happen".
The "KVO interface/controller" and "Exposed binding" may or may not be automatic. Many model classes will be KVO compatible already, although others may require a shallow layer to improve their compatibility.
The real work for bindings, is in designing views to be fully configurable through bindings alone.
Terminology: I've already mentioned KVC and KVO. These technologies are fundamental to how bindings work. If you don't have great familiarity with these terms, you can read the Apple programming guide to Key Value Coding and Key Value Observing. You could also read my earlier post on 5 key-value coding approaches in Cocoa but note that bindings require proper NSKeyValueCoding compatible KVC.
Implicit bindings support
In some situations, you might be able to connect a model and view with a binding with no cooperation from either the model or the view. This will be the case if your model is already KVO compliant and your view can be totally configured by piping this KVO data directly into KVC properties on the view.
For example, if your model has a text property that is only ever changed through its setText: method and you want to display that property in a text field, you can connect the two with:
[someTextField bind:@"stringValue" toObject:myModelObject withKeyPath:@"text" options:nil];Bindings will do the rest.
As soon as the binding is established, the binding will set the stringValue property of the someTextField to the value of the text property from the myModelObject. Every time the text is set using the setText: method, an automatic Key Value Observing notification will be detected by the binding and it will keep the text field in sync.
Normally though, bindings are used in situations where the view explicitly supports them. For example, with NSTextField, you would normally use NSValueBinding instead of @"stringValue". Ultimately, the NSTextField will map NSValueBinding onto the same @"stringValue" property but the supported binding guarantees compliance (and also supports other options like implicit conversion from NSNumber to NSString).
Adapting a delegate/dataSource view for use with bindings
Most views require a redesign so that they can be completely configured through Key Value Coding compliant properties. The reason for this is that the view must be completely configurable through KVC compliant properties to work with bindings.
In adapting UITableView for the Mac, I'll need to make such a redesign since UITableView does not expose the KVC properties we would require.
Looking at the situation before bindings
To achieve the features I want, a UITableView would require its dataSource to implement the following methods:
- tableView:cellForRowAtIndexPath:
- numberOfSectionsInTableView:
- tableView:numberOfRowsInSection:
- tableView:titleForHeaderInSection:
and the delegate would need to implement:
- tableView:heightForRowAtIndexPath:
- tableView:viewForHeaderInSection:
- tableView:didSelectRowAtIndexPath:
None of these methods set KVC properties so they all need to go.
Recategorizing delegate and controller methods as properties
We need to rethink what the table displays as data that we can set.
Ultimately, a UITableView contains two tiers of data: the section and the row. For each of the UITableView dataSource and delegate methods, we can consider the returned value as either a property of a section, row (or the array containing them).
tableView:cellForRowAtIndexPath:— Row propertynumberOfSectionsInTableView:— Property of the sections arraytableView:numberOfRowsInSection:— Property of the rows array within a sectiontableView:titleForHeaderInSection:— Section propertytableView:heightForRowAtIndexPath:— Row propertytableView:viewForHeaderInSection:— Section propertytableView:didSelectRowAtIndexPath:— Section array and rows array controller properties
ColumnView, ColumnSection and RowView binding interfaces
Structure of data used for the bindings
The bindings design for the ColumnView then comes directly from this categorization.
At the top level we need to bind the ColumnView to an array of sections. Each section must have a row array property.
Each "section" is not an object of any specific class — it can be any object from your model. To make it work, the ColumnView must also know the key path from the section to its content. This key path can be set by using a binding option when a binding is established for the sectionsArray. It is this type of key path traversal that allows the view to traverse model data whose structure it doesn't necessarily know.
The only tricky point is the tableView:cellForRowAtIndexPath: method. While the "cellForRowAtIndexPath" could be considered a property, the rows and sections here a model objects and having "view" properties on model objects is a bad idea.
I've opted instead to use the row's class as the property instead of a fully realized view. The ColumnView will then construct the view from this class. Further, this class does not need to come from the model object — other means of setting the row's class will exist that are unrelated to the model object involved.
Class structure to follow the data structure
To break the implementation down into manageable components, the design will use three classes:
ColumnView— does all of the layout and manages the array of sectionsColumnSection— manages the array of rows in each section and stores header informationRowView— mostly a drawing class but does report the height for the row, given its data
ColumnView
The only binding for the ColumnView is the ColumnViewSectionArrayBinding which sets the sectionsArray property (ColumnViewSectionArrayBinding is a globally defined string with the value @"sectionsArray").
Along with this binding, the ColumnView has the following additional properties that can be set in the ColumnViewSectionArrayBinding options:
sectionContentKey—A key path (relative to the section object) where the rows array can be found (if not present, it is assumed that the section is the rows array).sectionClassKey— A key path (relative to the section object) where the default class to use for all rows in the section can be found (if not present the defaultRowViewclass is used). This property is overridden by therowClassKey.rowClassKey— A key path (relative to the row object) where the class for the row can be found (if not present, it is assume the section is the rows array).rowDisplayKey— A key path (relative to the row object) where a separate object used for display is found (if not present, the row object is used directly for display).headerDataKey— A key path (relative to the section object) where the object for the header is found (if not present, no header is shown for the section).headerClassKey— A key path (relative to the section object) where the class for the header row is found (if not present, the defaultRowViewclass is used).allSectionsSortKey— A key path (relative to each row object) by which every section should be sorted.sectionRowSortKey— A key path (relative to the section object) where the key by which that section should be sorted can be found (this will override the allSectionsSortKey).
While you can set these properties directly on the ColumnView, it is expected that they will be passed in the options dictionary and picked up in the implementation of bind:toObject:withKeyPath:options: on the ColumnView.
ColumnSection
The ColumnSection is a simple data class to manage data associated with a section. It looks like this:
@interface ColumnSection : NSObject
{
    NSArrayController *rowDataArrayController;
    NSString *rowClassKey;
    NSString *rowDisplayKey;

    Class defaultClass;

    id headerData;
    Class headerClass;
}
All of these properties are set by the ColumnView using the properties it extracts from the sectionsArray by following the key paths options from the binding.
The array of row data is set by binding the NSContentArrayBinding of the rowDataArrayController instead of setting it directly as an NSArray property. This is done so that the ColumnSection can sort the array independent of the original data and so that the selection and other controller features of the NSArrayController could be used if desired.
RowView
The RowView has no bindings of its own — it doesn't bindings since its data is passed to it by the ColumnView which gets it from the ColumnSection.
Following the path of setting the data
To see how these bindings work to change the table, I'll explain what happens at each step.
1. The sectionsArray property is set by the binding
Immediately after you establish a binding, the bindings will set the value of the underlying property to be the same as the model object to which it is bound.
- (void)setSectionsArray:(NSArray *)newSectionsArray;When the sectionsArray is set by the ColumnViewSectionArrayBinding, the ColumnView's setSectionsArray: method is invoked where it constructs a ColumnSection object for each section.
2. The constructed array of ColumnSections is set as the columnSections array
- (void)setColumnSections:(NSArray *)newColumnSections;The final step in the setter for sectionsArray sets the columnSections property of the ColumnView using the constructed array of ColumnSections objects.
This method observes the rowDataArrayController's arrangedObjects (in case a row in the section changes) and triggers a reload of the view.
If you wanted to bypass bindings for the sections (to use static, manually created sections), you could create and configure the ColumnSection objects yourself and set them using this method.
3. Reload the view
The ColumnView then accesses the properties on the ColumnSection objects to populate the table. Only rows and headers that are visible are constructed, positioned and displayed.
I show this code next time with the implementation of the ColumnView.
End result
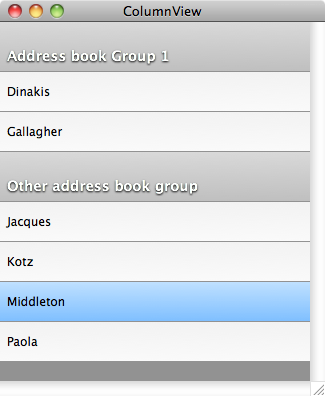
The end result of a class designed this way is that configuring the ColumnView is done with a single statement. For the screenshot I showed at the top, the ColumnView is configured with data from the ABAddressBook with a single statement:
[columnView
    bind:ColumnViewSectionArrayBinding
    toObject:[[AddressBookDataController sharedController] groupsController]
    withKeyPath:@"arrangedObjects"
    options:
        [NSDictionary dictionaryWithObjectsAndKeys:
            @"members", ColumnViewSectionContentKeyOption,
            kABGroupNameProperty, ColumnViewSectionHeaderDataKeyOption,
            @"Last", ColumnSectionRowDisplayKeyOption,
        nil]];
This selects the arranged groups from the AddressBookDataController and uses them as sections. The title of each section is the group name, the content is the group's members and the object used for display is the lastname of the group member.
This one statement replaces the 6 dataSource and delegate method implementations that UITableView requires for the same functionality. If you create an IBPlugin for the view, you can configure all of this in Interface Builder and reduce the lines of code to zero.
Obviously, I'm going through a small controller here: the AddressBookDataController. This is because the ABAddressBook does not send KVO notifications when groups or their contents change and further, ABGroups are not KVC compliant for their members method. This controller is to address these problems, sort the groups by name and handle a situation where no groups exist. This work is not really bindings related and would be required in some form if the ColumnView were configured another way.
To be continued...
Matt, I can't help but notice you haven't shared the complete implementation of the ColumnView class.
Well spotted, voice in my head. I wanted to focus on bindings and how to redesign an interface to work with them. I've already run way past the time I was going to spend on this. In my next post, I'll share more about the implementation and let you see all the code.