

In the previous article, I looked at how SwiftUI’s data-driven changes force a basic separation between Model and View. The separation is limited in scope, requiring only that there exist a state value or observable object that drives view updates.
If a cleaner separation between Model and View is desired, then slicing an app into modules (Swift’s name for discrete libraries) is the best technical step you can make. Separating architectural layers (e.g. Model, View, and optionally others) into their own modules lets you establish rules about how to connect your layers, which types and properties should be accessible and keeps the overhead low on adding new layers.
If you’ve ever wanted to improve your app’s architecture, simply moving your Model into a separate module is a step you should take before choosing to make any other architectural change. It can reveal problems you never realized you had and prevent future problems.
The problem
When I wrote the CwlFeedReader app, in the first article in this series, the Xcode project navigator looked like this:
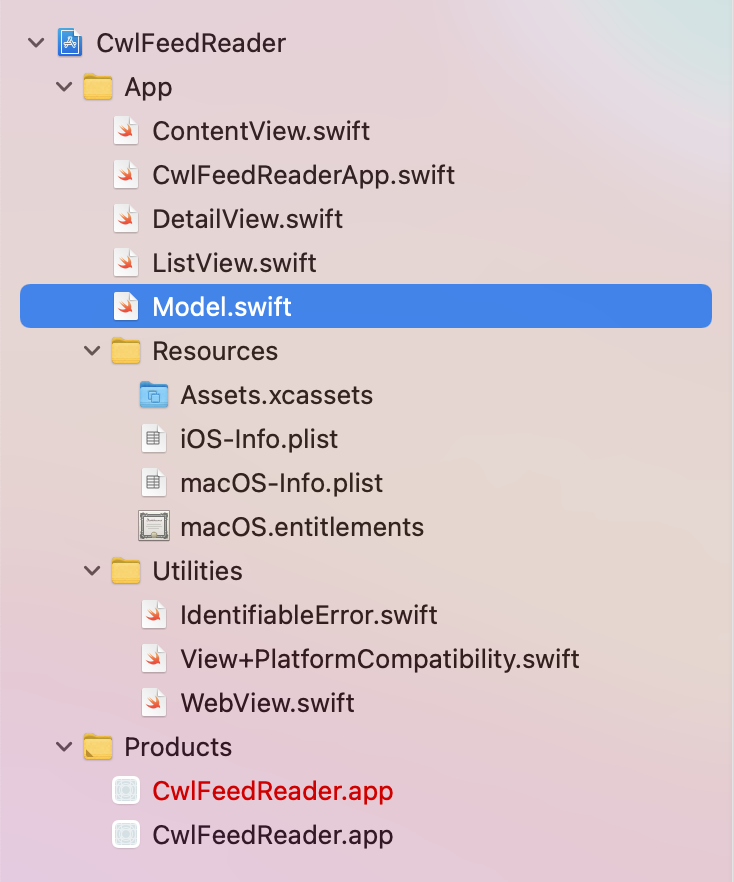
Starting state of the CwlFeedReader app
The app is really just 5 files in a single folder. I’ve placed three “Utilities” into a separate folder but the primary reason for this is that these are components I didn’t really discuss during the article - they are dependencies and I don’t consider them part of the app.
Is there really any problem that we need to solve, here? The app is very small and simple; we don’t need to break it up.
The reasons I want to break up this project fall into the following three categories.
1. Interface design
Everything internal on Model is accessible by the View-layer types. The View could do ill-advised things like start its own downloads and store them directly on the URLSessionDataTask or update the feed following user changes and store it back in the same location – potentially conflicting with Model-driven updates.
These are the sorts of obviously-bad short-cuts which get written when developers are rushed or aren’t thinking clearly about encapsulation. If problems like this aren’t cleaned up before committing code, then suddenly the app is full of surprising bugs. Yes, we can prevent this in a simple way by marking these properties as private but then we remove the ability to break the Model class across multiple files (because everything that needs to access private must stay in the same file).
We either have a gigantic Model file with everything marked private or a leaky interface requiring constant vigilence.
Better to have Model live in a separate module. If something is View-safe, we mark it public. If something requires strong control, we can use private but internal access becomes truly useful – especially since internal is the default.
2. Connection rules
The Model-layer should never reference any types from the View-layer; the connection arrow must point from View to Model. In a single module, we can’t prevent the Model from accessing View types. Once we move the Model to a separate module, we can let the build system enforce that for us.
3. Unit testing
This is a technical consideration due to how Xcode projects work but everything about adding testing bundles to Xcode projects is higher friction than adding a testing target via the Swift Package Manager.
For example, if I were to add a unit testing bundle to this project it would add 130 lines to the pbxproj file and Info.plist. That addition is nearly as big as the Swift code-size of the app. Even though most of those lines are autogenerated, Xcode expects us to maintain all of these settings. The appearance alone of that much boilerplate in a git merge request is mind numbing.
Further, if we wanted unit tests for both macOS and iOS (remember, this is a multiplatform project) we would need to add two unit testing bundles. That’s 260 lines of Xcode project configuration.
The final insult is that trying run unit tests attached directly to the app is practically useless because the entire app will run whenever the testing bundle is loaded. Having an entire app running in the background is likely to interfere with tests and even if it doesn’t it will certainly slow down the tests.
Creating an inline Swift Package
Historically, I would solve some of the above-mentioned problems by creating child frameworks. You would go to the “File → New → Target” menu and create a new iOS Framework. If, for some reason, your project can’t use the Swift Package Manager then this remains the best approach.
However, separate frameworks have many of the problems listed under “Unit Testing”, above: there’s xcodeproj bloat and you need a separate framework per platform.
Fortunately, we have the Swift Package Manager and it offers a much better experience.
Documentation on the Swift Package Manager in Xcode is almost entirely focussed on adding dependencies from outside your project or creating libraries to be shared outside your project. Neither of these are features that interest us, here.
You don’t need to use the dependency management features of Swift Package Manager for it to be useful.
For the CwlFeedReader app, I selected “File → New → Swift Package…” from the menubar. When the “Save As:” dialog appears, I went to the same folder that contains the CwlFeedReader.xcodeproj file for the project, typed “CwlFeedReaderLib” in the “Save As:” name field and selected the “CwlFeedReader” project in the “Add to:” and “Group:” popup menus.
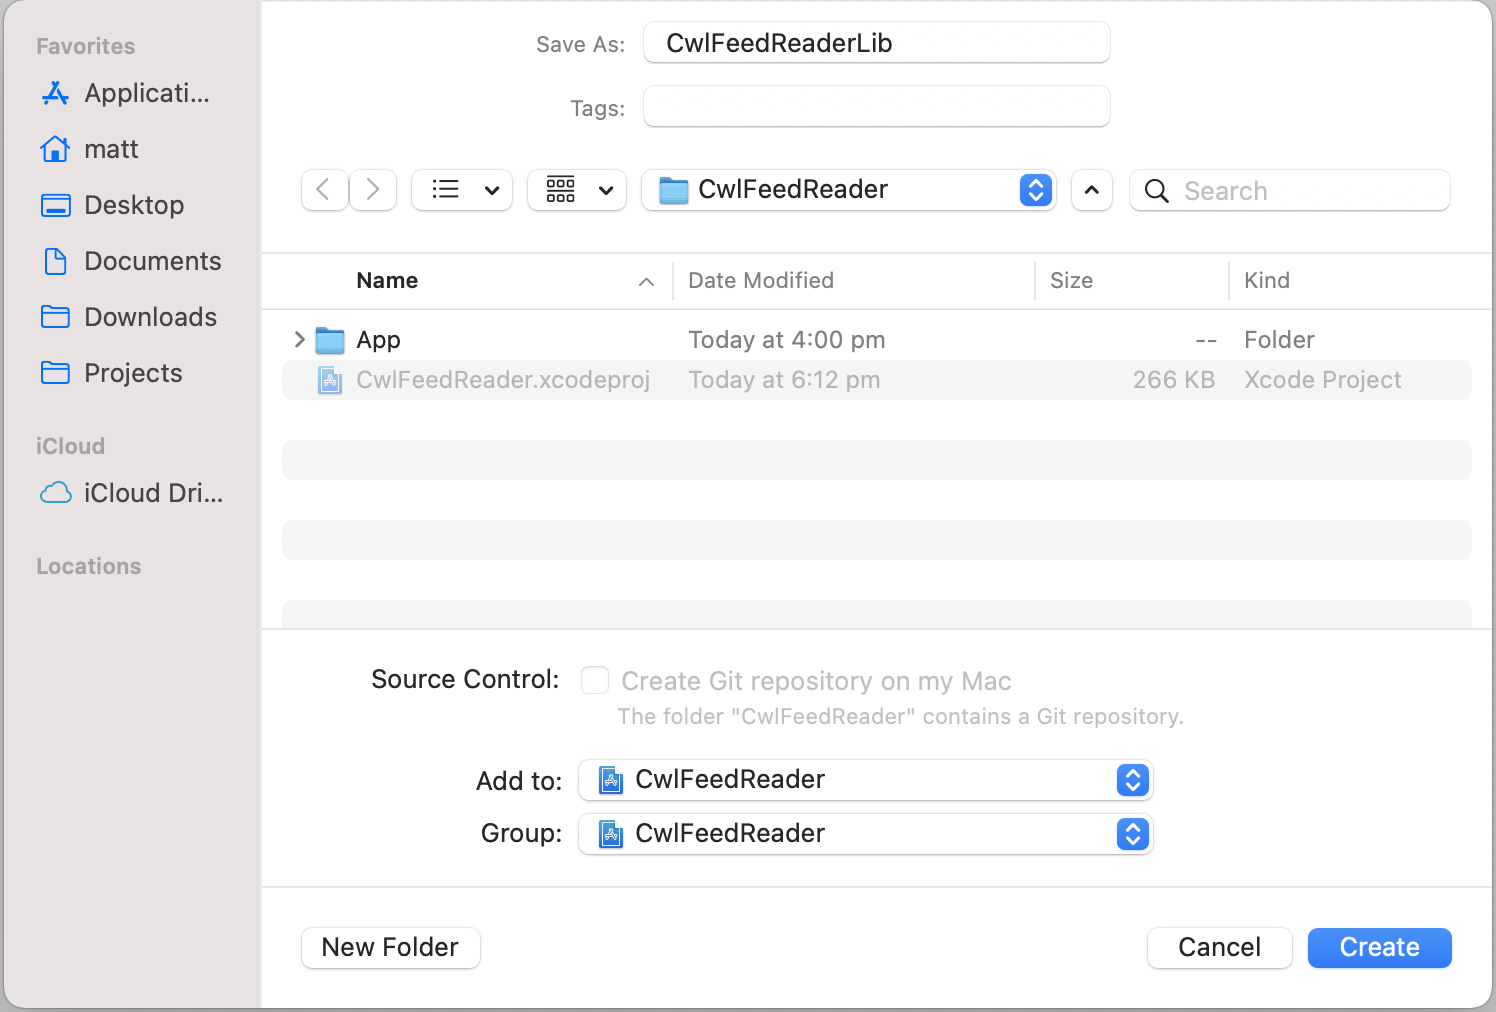
Creating an inline Swift Package
After the package was created, I went to the CwlFeedReader app’s Target and added CwlFeedReaderLib under the list of Frameworks, Libraries and Embedded Content.
Establishing the desired structure
Now, I can reorganize files in the project browser to place “Model.swift” under “CwlFeedReaderLib/Sources/Model”, the “IdentifiableError.swift” under “CwlFeedReaderLib/Sources/Toolbox” and “View+PlatformCompatibility.swift” and “WebView.swift” under “CwlFeedReaderLib/Sources/ViewToolbox”.
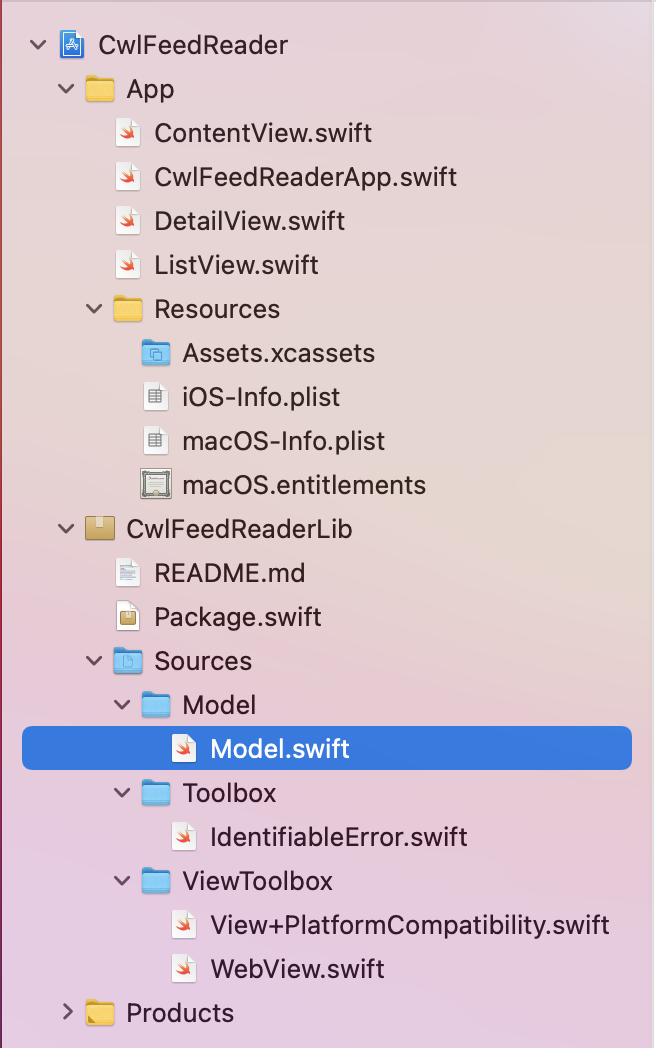
Desired state of the CwlFeedReader app
Updating the Package.swift file to include these locations gives the following:
// swift-tools-version:5.3

import PackageDescription

let package = Package(
   name: "CwlFeedReaderLib",
   platforms: [.iOS(.v14), .macOS(.v11)],
   products: [
      .library(
         name: "CwlFeedReaderLib",
         targets: ["Model", "Toolbox", "ViewToolbox"]
      ),
   ],
   targets: [
      .target(
         name: "Model",
         dependencies: ["Toolbox"]
      ),
      .target(
         name: "Toolbox",
         dependencies: []
      ),
      .target(
         name: "ViewToolbox",
         dependencies: ["Toolbox"]
      )
   ]
)
Notice that I’m already using the Swift Package Manager to create a few addditional modules with “Toolbox” and “ViewToolbox” keeping reusable dependencies outside the “Model” and “View” components.
The reason for this type of separation is to identify files that should contain no app-specific logic – it’s telling any reader of the code what to expect and promoting code re-use. Neither of these points is essential but since the effort is low, they are both good to promote.
Imports and access modifiers
Once we’ve actually separated our Model and Toolbox dependencies, everything will break.
The “Model.swift” file will need to import Toolbox. All four files remaining in the App folder will need to import Model and “DetailView.swift” will need to import ViewToolbox.
Once that’s done, everything the View needs to access in the Model module will need to be marked public.
I won’t list everything here but you can examine the diffs in the final commit on the “Part 3” branch of the CwlFeedReader code repository.
Submodules?
I’ve taken an Xcode project in a single repository and broken it into multiple internal modules.
Submodules is a proposed language feature that would be able to achieve a similar effect without the Swift Package Manager. All the code would reside in a single Swift module but you would be able to “namespace” some sections as residing in a separate submodule. Draft proposals exist to add them to the language. However, submodules has never moved past the draft proposal stage and it’s not clearly going anywhere.
It’s possible submodules will never be implemented but that doesn’t worry me. I usually dislike touching build-systems but I think this is one problem that might be more cleanly solved at the build-system level than the language level. Build-system enforced isolation makes accidental violations of encapsulation harder and therefore separation is cleaner.
However, potential changes to either Swift or Xcode do make me wonder what the lifetime of this article will be. The advice to “isolate your layers” will never be wrong but the implementation could be superceded.
Submodules could be implemented in Swift and introduce confusion about whether they’re better or worse for the job.
The xcodeproj format in Xcode could be replaced by Swift Packages with apps created as a single Swift Package with the basic “Model” and “View” modules immediately created by the “New Project” app template. Of course, I’ve been hoping for xcodeproj deprecation since 2015; I have no reason to believe it will change in the next couple years.
Conclusion
The full code for this article is available from the part-three branch of the CwlFeedReader repository.
As with most of this “App architecture basics in SwiftUI” series, I’m not doing anything revolutionary, here. I’ve spent about half this article giving a tutorial on how to add a Swift Package to an Xcode project.
The bigger message that I want to convey is that layer-isolation requires a tiny amount of up-front work but it yields clear benefits. When applying this type of separation to established projects, it’s common to discover large numbers of bugs and undesired behavior due to Model and View accessing each others internal details. It’s a change that informs us about our own laziness.
It’s also a change that has productivity benefits moving forward. New modules are now trivial to add. Remember the 130 lines times 2 platforms increase when adding a testing target? Now it’s 4 lines, total, without the possibility of the app running and interfering in the background.
Looking forward…
While I mentioned “tests” in this article, I never wrote any. That will change in the next article as I highlight the most important architectural inclusion that this app is still missing.
App architecture basics in SwiftUI Part 4: Services